

(This lovely DIY how-to was written by small-scale.net's blog author's galfriend April, who recently made a fantastic straw mattress for the cob bed. Not only is it entirely natural, it’s pretty super to sleep on, too. Read ahead!)
Living in a hand-built home can often mean making unique and non-conventional furniture choices. I recently transitioned from a tent to a cob house and ran into the dilemma of what to do about a bed. My criteria was something natural and sustainable, economical, readily available, quick and easy to assemble, and comfortable. Is that too much to ask? I decided to do some research first.
Why not to buy a conventional mattress
I looked at some conventional mattresses. What the heck is in those things, I asked. These mattresses are composed of metal coils, often plastic coated, encased in fabric and padding. As a result of their materials and manufacturing, they also contain Volatile Organic Compounds (VOCs), formaldehyde, and chemical fire retardants that will off-gas over time. And, with a price tag of over $350 for a full size mattress, this option isn’t particularly economical. However, there is such a thing as eco-friendly and organic mattresses. These usually contain organic cotton or wool, non-toxic fire retardants, natural latex rubber, and recycled metal springs. But with an even heftier price tag of around $1000 for a full size mattress, this wasn’t really an option for me at all.
Traditional mattress materials
What about making my own mattress? People have been making their own beds for thousands of years. The ancient Romans used straw, an agricultural by-product, to make their mattresses. Another by-product, rice chaff (the husks separated from the edible grains), is used as mattress filler in Asia and oat chaff was traditional in Scotland. At first, making my own mattress sounded too ambitious since I’ve got a minimal amount of sewing experience, but straw is natural, locally available, and at $2.00 – $4.00 per bale, it was worth a try. If it didn’t work out, disposing of my straw mattress would be as simple as reusing the fabric for another purpose, and dumping the straw in the garden for compost. (Most conventional mattresses go to a landfill at the end of their lives.)
Making a tick
I needed to make a simple sack, traditionally called a tick, to serve as the mattress cover. A sturdy cotton fabric with vertical blue stripes, called ticking, is still used for mattresses today. I chose heavy fabric woven from 100% cotton, or duck, because it appeared to be more sturdy and durable for my purposes.
My mattress would rest on a cob platform pressed against a curved wall along one side. Because of its custom shape, my first step was to lay down a sheet of paper (I used sheets of newspaper taped together) to trace a template for the mattress shape. For someone making a conventional-sized mattress, this step is as easy as finding dimensions for the appropriate size bed frame (twin, full, queen, or king).
Designing a template

Next, I laid the paper template on my fabric and added an inch to each side (2 inches added to the total width, 2 inches to the total length). I cut out the top and bottom panels at the same time to eliminate any shape inconsistencies. Mattress thickness can be based on personal preference. I chose to make the side panels for my mattress 9 inches wide (7 inches when finished) based on the height of the bed platform. I cut out rectangular side panels from the leftover scraps of my large panels and sewed them into one strip long enough to go around the perimeter of the two long sides and one short side of my large panels. (The other short side is where the button closure goes for stuffing straw – more on that later.)
Next, I pinned and pinned and pinned. Don’t underestimate this step. It takes a lot of patience, but the attention to detail  at this point will make sewing much easier later. I took the edges of each panel (about ½ inch) and folded them over twice before pinning to reinforce the seam and make a finished edge on both sides of the fabric. This ensures that your fabric won’t unravel and should make stuffing much easier. You can attach panels to each other by folding with the edges sandwiched together. Make sure to insert pins perpendicular to the direction the thread will be sewn (if using a machine) so the needle glides easily over the pins. This fabric is heavy and unwieldy so pinning one side at a time makes it easier to push through a standard-size sewing machine. Also, make sure to use a heavy-duty needle, made for canvas or jeans, and thick thread.
at this point will make sewing much easier later. I took the edges of each panel (about ½ inch) and folded them over twice before pinning to reinforce the seam and make a finished edge on both sides of the fabric. This ensures that your fabric won’t unravel and should make stuffing much easier. You can attach panels to each other by folding with the edges sandwiched together. Make sure to insert pins perpendicular to the direction the thread will be sewn (if using a machine) so the needle glides easily over the pins. This fabric is heavy and unwieldy so pinning one side at a time makes it easier to push through a standard-size sewing machine. Also, make sure to use a heavy-duty needle, made for canvas or jeans, and thick thread.
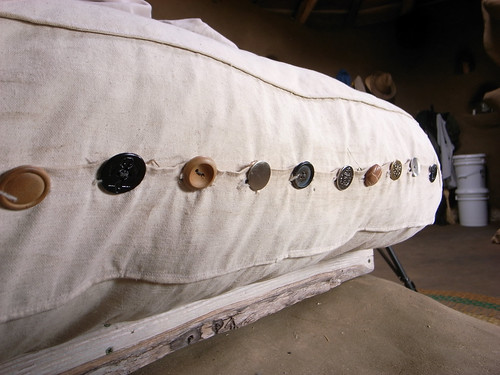
The panel for the button closure was a little trickier. I wanted the closure to button in the center of the panel rather than at the seam to help put less stress on the edges of the mattress. And they need to be strong enough to take daily abuse. So, I cut out two panels to make up the closure side (one 6 inch wide panel and one 5 ½ inch wide panel) and finished one long side of each panel (where the buttons and button holes would be sewn). After over-lapping the finished edges (about ½ inch), the panel should be 9 inches wide (like the other sides) and easy to sew in place. After sewing everything up, I turned it inside out and stuffed the mattress!
Stuffing the mattress
Stuffing is pretty self-explanatory. Make sure to break up the straw bales thoroughly and stuff evenly. Stuff more tightly for a firm mattress without lumps. You can use a stick or rake to help push straw into corners, or climb into the tick yourself to get the straw packed especially well.

The mattress looked a little absurd once I got on the bed because it was so huge, but the straw eventually settles to the intended thickness after a couple weeks of use. After about four to six months, the straw will be replaced. This is because the straw will become quite compact after much use.
In total, I paid $29.00 for fabric and thread, and $6.00 for 3 bales of straw. All told, it took me about a week and $35 to make my own comfy straw mattress!
For more information, visit small-scale.net - what a wonderful site!
Hey! Thnx for this i was eagerly finding dis ,Long Back ! Thnx a Tonn latex mattress
ReplyDeleteHello,
ReplyDeleteThere are many different types of mattresses and sizes. But finding the perfect mattress is more than just size and type, it's ultimately about comfort.
Thanks
I have a latex topper and I bought my son and daughter a latex bed and we all love ours. be sure to check how you like your bed, firm soft etc to find the right latex the first time due to cost...we used the tax return. this is a great blog on making your own bed though! If I were any kind of sewer at all I would make this ...I may pay someone to make this and wait another year to buy our own latex bed and pay off more debt...THEN I can use this diy bed as my base and put my topper on top and do away with the chemical laden one the topper is on now.
ReplyDeleteI'm sure coming again to construe these articles and blogsfoam mattress
ReplyDeleteYour articles are purely enough for me.memory foam
ReplyDelete